Saturday, April 28, 2012

Still in Virginia – but not for long!

After determining the location of Hawksbill Church (which was named after a small river rather than the mountain peak) I headed back into Shenandoah National Park on November 3rd. Two days later (and as many very cold nights) I was at the southern terminus of Skyline Drive. The weather had been rather dreary and the color was gone from the few leaves remaining on the trees. But it was still a very pleasant drive. I didn't hike as much as I would have liked though because it was just too windy and too cold.

I wanted to get out of the mountains and back to the coast. But there were a few stops along the way and Mother Nature would have some say in the matter.

Two main stops were at the Walton's Mountain Museum in Schuyler, Virginia – hometown of Earl Hamner, Jr. and Appomattox Court House. Both sites were interesting in their own way. I was a fan of “The Waltons” from the time it first aired. The exhibits were informative and they had a lot of pictures. At Appomattox, I sat in on a chat with one of the volunteer Rangers and was reminded of bits that I had forgotten and learned a few new things as well. It was the highlight of my visit there.

For the next few days I stayed at two Virginia State Parks – Holliday Lake (near Appomattox) and Staunton River (near South Boston and about 25 miles from the North Carolina Border). On Monday (November 6th), I checked into a motel and learned that Tropical Storm Ida was due to go ashore near Mobile Bay. The wind and rain would be into the Carolinas the next day with the possiblity of 4-6” of rain. I had waited a bit too long before heading south, so I decided to go back north towards Richmond, partially to meet up with my friend TJ (who also happens to be a distant cousin) and then visit Williamsburg and Jamestown, eventually going down the coast of the Carolinas, specifically Cape Hatteras National Seashore.

But Ida changed directions and stalled out and, in the last two days, has dumped 6 inches of rain, more in some places, in southeastern Virginia! Currently (the morning of Friday the 13th) it is still windy in Richmond but the rain has pretty much stopped. Now is probably not the time to take the route I had initially planned so I'll be going back west, towards the mountains and then south, avoiding the flooded areas along the coast.

Friday, April 27, 2012

Dry pond


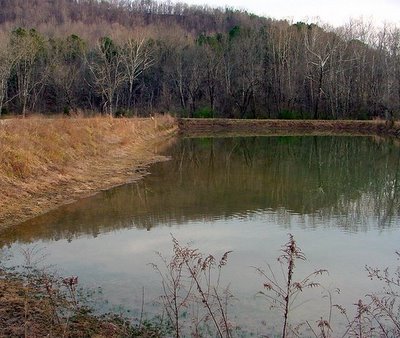
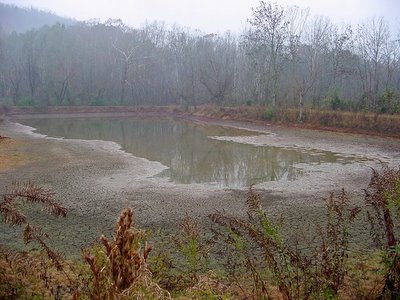
After Hurricane Katrina last August, it did not rain until the first of October. Then it was dry again for a long while. The pond shrank.

It's deeper at the far end than it appears, but I had nightmares of fevered fish rescues... up to our knees in muck, trying to corral flopping fish who couldn't understand the concept of their own salvation.

I had sometimes wished for a little mud edge in the summer, which might prove attractive to migrating shorebirds. But that's a lot of edge, and the shorebirds are long gone.


Before the end of the year, it started raining again... better, but not yet normal. I heard it's supposed to rain all weekend, so maybe that will help.

Of course Jasmine likes it dry, since she can get right up to the edge and bark at fish.


In the background is the tree that fell during a storm. Beavers had gnawed all around the base, so even though it leafed out last summer, I suppose it was only a matter of time before this happened.

-----

Critters at Friday Ark.

Wednesday, April 25, 2012

Covered Walkway

This is the covered walkway by the side of the church where their offices are.

Sunday, April 22, 2012

Bull Snake

With all the moving of dirt with the tractor a snake was discovered wondering around wondering what was happening to his home. We assumed he or she was a bull snake as it didn't have any rattles on it's tail but it could have been some other kind of snake as I am not very versed on snake species. Anyway we encouraged it to slitter up in under a wild four-a-clock clump and it has not been seen since. I don't bother them if they as they eat lots of mice and rats of which we have enough for several snakes like this one.


Thursday, April 19, 2012

My new boat!


Well, after 10 years of wanting a kayak I was finally able to get one! I went down to Duluth this week and picked up a Wilderness Systems Tsunami 165. I could barely contain my excitement as I drove back from Duluth with the kayak on top of the car. This evening I went for my first paddle in the new boat.


It was a sublime evening on the bay, perfect for trying out the boat and getting a feel for it. I was just going to goof around right in front of the house with it, but it was so nice I decided to actually "circumnavigate" the bay with it. The first thing I noticed was how much easier it glides through the water compared to my canoe. I played around for a little while in front of the house, practicing turning and getting used to the feel and balance of the boat. Then I headed over to the Hat Point Marina and paddled up to the Isle Royale ferry "Wenonah", which looks positively gargantuan from the seat of a kayak! Next, I headed for Pete's Island. After only about 10 minutes of paddling, I was at the island (I thought it would take longer to get there!). I landed and got out for a minute to stretch my legs (not used to the sitting position yet!).


For the next leg of my "trial paddle", I went from Pete's Island to "The Pines", a picnic area on the east side of Grand Portage National Monument. As I crossed the bay there was a gentle swell rolling into the bay and every now and then one of the swells would give me a little push, causing my speed to increase. As the boat rose and fell on the backs of these swells, it was a wonderful feeling. It felt like I could feel the lake breathing. I can tell I'm going to love this sport! This wasn't my first time kayaking, but it had been awhile so the sensations all felt new again. After reaching the pines, I turned and followed the shoreline back to my house. This part of the bay is very shallow and almost entirely sand bottom. It was fun gliding along and watching the ripples in the sand as they passed beneath the boat. When I got back to my place, my brother was sitting there waiting for me. He had seen me paddling and wanted to give the boat a quick try. I pulled up parallel to shore and in my haste to climb out, promptly tipped over on the lakeside of the boat and got completely wet. Oh, well! I also got to try out my new bilge pump :-) I can't wait until the next outing!

Fade to red


A dead cedar had started leaning onto the fence so Phil cut part of it off. I thought the color was interesting. The heartwood is purple like this when it is first cut, but fades to a reddish-brown color within a week.


Eastern Red Cedar (Juniperus virginiana) isn't really a cedar, but a juniper instead. At one time, almost all pencils were made out of wood from this tree, but nowdays it's only about 10%.

The Tale of a Midtail Cruiser

Josette's Yuba Boda Boda


Traveling through the suburbs last week, I suddenly spotted something green and curvy zipping toward meon the opposite side of the road. It was a Yuba Boda Boda cargo bike - not a common sight around these parts. The woman astride it looked happy and carefree. As we passed each other, both of us waved with the zeal of true bicycle obsessionists, and yelled hello. I then spent the rest of the morning wondering who this mysterious woman was and how I could get a better look at her bike. But I didn't have to wonder long. Having recognised me, she soon got in touch and we arranged to meet up.


Josette's Yuba Boda Boda

Josetteis a local cyclist and mother of two boys, ages 6 and 3. She lives in a hilly outer suburb of Boston and works in a neighboring, equally hilly suburb. Her typical daily commute involves taking her younger son to preschool, as well as cycling to and from work, for a total of 13 miles plus errands. Josette got back into cycling as an adult a few years ago, and has since owned a couple of bikes, including a modern hybrid and a vintage English 3-speed. She now wanted a cargo bike that was both easy to ride and could handle two children. She tried several cargo bikes, before settling on the Boda Boda - a new "midtail cruiser" model from the California-based Yuba: The Boda felt easier to manage than full sized longtails, and the handling felt more intuitive than that of the Dutch bakfiets. Josette purchased the bike at Ferris Wheels in Jamaica Plain (Boston) and has been riding it since October.


Josette's Yuba Boda Boda


Yuba refers to the Boda Boda as a "cargo cruiser." Named after African bicycle taxis, this model was created in response to requests for a shorter wheelbase, lighter weight and lower stepover.On top of that, it promises casual handling combined with the ability to tackle hills. Featuring an aluminum frame, 26" wheels, fat tires, swept-back handlebars and 8-speed derailleur gearing, the Boda weighs 35lbs and is rated to carry over 200lb. There are two versions of this model: the Step-Through, shown here, is smaller in size and features a lower stepover. The base retail price is $999.


Josette's Yuba Boda Boda

The midtail rear end of the Boda features an integrated rack with a bamboo platform and an optional "Soft Spot" pillow - handy for ensuring passengers have a comfortable ride. Josette personalised hers with a customcrocheted cover, which gives a charming and unique look to the whole setup.


Josette's Yuba Boda Boda

The platform as shown here can fit both of Josette's children.


Josette's Yuba Boda Boda

Although I only met her younger son, this picture illustrates how both boys fit on the bike. Josette's blog post on riding with kidsprovides more details about her experience.


Josette's Yuba Boda Boda

The "apehanger" style handlebars in the rear were an aftermarket addition, as Yuba's standard "Hold On Bars" did not work here. The main issue was that, given Josette's saddle height and the height of the rear rack, there was no way to install Yuba's standard handlebars so that they'd reach above the rack. In addition, the wider and more swept back apehanger bars make for a more accommodating and comfortable position for Josette's boys.


Josette's Yuba Boda Boda

The Boda's rear rack height is an interesting topic. You can't quite see this in my pictures because the bags cover it up, but the Boda's rack platform sits unusually high. This is because the e-assist version of the Boda (aka the El Boda), has its battery stored underneath it. Josette's feedback is that the extra height of the rack feels suboptimal, both as far as weight distribution when carrying passengers and cargo upon it, and as far as saddle height adjustment. For example, very short riders may have difficulty moving the saddle all the way down despite the extra seatpost showing, because at some point the saddle will start to interfere with the rack. Also, because the handlebars had to be threaded through the rack, I was not able to raise the saddle to my optimal height when test riding this bike. Despite the quick release skewer, the setup shown here cannot be easily shared between persons of different heights.


This issue aside, the owner is happy with the carry capacity the Boda affords. In addition to allowing her to carry two children on top of the platform, each side of the rack accepts two full-sized panniers, or Yuba's own "Baguette Cargo Bag" (The orange bag pictured is apannier hybrid bag from Vaya, made in NYC).The front "Bread Basket," rated to carry 50lb of weight, can be purchased for even more carry capacity.


Josette's Yuba Boda Boda

The Boda Boda comes standard with swept back Dutch stye handlebars, cork grips, city brake levers, and painted bell,


Josette's Yuba Boda Boda

26" wheels and wide, cushy cream tires,


Josette's Yuba Boda Boda

platform pedals,


Josette's Yuba Boda Boda

and a minimalist chainguards.


Josette's Yuba Boda Boda

Fenders and a double-legged kickstand were added as accessories, as was dynamo lighting front and rear, and the front wheel "Deflopilator" stabiliser.


Josette's Yuba Boda Boda


I took the Boda Boda out for a quick spin. Though Josette graciously offered to lend me her son, I did not feel comfortable with that plan, and just rode the bike with 3 panniers on the rear. Mostly I was interested in the feel and handling, so I did a short loop that involved a local hill.


This bike is a little strange to describe. If you've ever ridden a Northern European hybrid circa the mid-2000s (à lathis), the position the Boda puts you in is very similar.The closest non-obscure equivalent I can reference is maybethe Breezer Uptown, but it's really closer to the European bikes. Mounting and dismounting, the stepover was indeed very low. There wasno toe overlap with the front wheel when turning, although it was surprisingly close; not much clearance. Yuba does not provide geometry charts, but the cockpit area felt extremely compact, and there was something about the position of my butt in relation to the pedals (or saddle in relation to the bottom bracket, if you will) that I associate with a particular type of hybrid or cruiser type bike. At the same time, I have to admit that the Boda felt light and speedy. And the low gearing allowed me to pedal it up a major hill without having to dismount (Josette tackles that same hill on a daily basis, and only has to dismount when both kids are on the back of the bike). The ride quality over potholes was nice and cushy.


Josette's Yuba Boda Boda

In essence, my first impression is that the Boda Boda is what it claims to be: a cargo cruiser with easy handling that is ridable in hilly areas.


Considering my recent test rides of the Xtracycle Radish, a comparison of the two is probably in order. The obvious difference is that the Boda is shorter and a bit lighter. This will make it more manageable for those who consider full longtail bikes unwieldy, but at the expense of giving up load capacity. The Boda has a somewhat lower stepover, which makes it easier to mount and dismount. As far as fit and handling, I prefer the Radish, simply because it feels more natural and intuitive for my style of riding. Others might feel differently.


Josette's Yuba Boda Boda

Having ridden the Boda on a more or less daily basis since October, the owner is pretty well used to it and enjoys the freedom of mobility it's given her.


Josette's Yuba Boda Boda

With her boys and without,Josettehas ridden the Boda in all sorts of weather, though overnight she keeps it in her garage and during the day at the bike parking facility in the basement at her work.The bike has served her well in the course of daily use. Some words of criticism include the rear rack height, the delay with receiving some of the accessories (she is still waiting for the Bread Basket), and the fact that the price of each accessory adds up to make the true price of the bike, once it's fully equipped for commuting, nearly double the stated MSRP. Still,3 months down the road Josette is pleased with her decision to choose the Boda over other cargo bikes. It suits her riding style and her lifestyle.

Tuesday, April 17, 2012

Reflective Paint - the Ultimate in Hi-Vis?


image via BikeSafeBoston

I've been documenting the making of a new bike for Josh Zisson of Bike Safe Boston, and he has this crazy idea to make the entire bicycle reflective - as in tire sidewalls, wheel rims and even the frame itself. Apparently there is a paint and powdercoating company in Indianapolis called Halo Coatings and they've developed a way to add an ingredient to powdercoat that would make it reflective under direct light ("halo patented retro-reflective powder coating"). I had a hard time believing this until I saw it in person. The orange paint chip above would be the colour used on his wheel rims. And watch what happens to it when it's photographed with flash:


image viaBikeSafeBoston

Neat, isn't it? Examining the colour chip up close, it's got these tiny mirror-like particles embedded in the powdercoat and they create the reflective effect. The technology is very new, and so far there is only one bicycle I know of that it's been used on - a cargo bike by Tsunehiro Cycles that won 2nd place at the Oregon Manifest last year. Here is what that bike looks like in the dark. The potential of this product is exciting - though personally I can't decide whether reflective paint is a genius idea for city bikes, or whether it's sensory overload. I would need to see it in person I guess. What do you think - would you want a reflective bike?

Sunday, April 15, 2012

A Subtle Surprise: Brooks Cambium C-17

Brooks Cambium C17

Earlier this year Brooks surprised their fans by announcing the release of a non-leather saddle: theCambium C-17. Selected to be one of the beta-testers, I must have been in the very last wave of recipients, because the saddles have been out for months now and mine arrived only last week. About to head back to Ireland, I threw it in a suitcase and, after several days of jetlag, have now finally managed to get a good look. I have not tried the Cambium on a bike yet, but wanted to post some shots and first impressions, figuring many of you are as curious as I was. And there is good reason to be curious: The Cambium is quite a departure for Brooks of England - a storied manufacturer whose very claim to fame is its leather saddles.


Brooks Cambium C17

As Brook describes it, the Cambium C-17 is made "from vulcanized natural rubber and organic cotton enhanced by a thin layer of structural textile for added resilience." Considering this is a bike saddle, I'd assumed the fabric would be treated with something to make the surface smooth. But the surface has a distinct texture to it similar to that of artist's canvas or some types of denim. While it's been treated for stiffness and waterproofing, there remains a bit of tooth to it. For that reason I have to admit, I am reluctant to try this saddle with lycra cycling shorts - which can be delicate and abrasion-prone in the seat area. But I'll do it, and will let you know how it goes.


Brooks Cambium C17

As far as looks, the one word that comes to mind in describing the Cambium is "subtle." This is a minimalist, low key saddle, not an ostentatious one. The colour of the cloth is half way between gray and taupe. In person, it can look either charcoal gray, ashy brown or even mauve, depending on what it's placed next to. This is rather nice, in the sense that it will match pretty much any bike. The brooks logo is stamped tone on tone into the rear of the undercarriage and is only noticeable close-up. The metal bits are matte, almost dull. The overall shape is somewhere between a Brooks B-17 and an '80s style vinyl racing saddle.


While the Cambium's "C-17" label suggests it has the same dimensions as the B-17 touring saddle, this is not the case: The C-17 is narrower (162mm across, compared to the B-17's 175mm), longer (283mm, compared to the B-17's 275mm), and has less height to it (52mm, compared to the B-17's 65mm). The Cambium should be suitable for a more aggressive bike position than the B-17. The weight of the Cambium is 415g (compared to 520g of the standard B-17). The ladies' version - the C-17S - is the same as the C17 in every way, except 18mm shorter and 10g lighter.


Brooks Cambium C17

I did not receive any special insight into the Cambium's construction from Brooks, so I am just describing what I see. It looks like the undercarriage is modular, similar to Berthoud, with (rivet-shaped) screws instead of rivets.


Brooks Cambium C17

The matte metal resembles titanium, but it is not labeled or described as such, so I assume it is cro-moly.


Brooks Cambium C17

Stamped "natural rubber vulcanized in Italy," the saddle is extremely flexible - I can easily bend and twist it with my hands. I imagine Brooks was trying to replicate the hammocking/ suspension qualities inherent to their leather saddles, and this was the solution they came up with. I am eager to experience the feel of this on a bike - especially on bumpy roads, chipseal and gravel.


Brooks Cambium C17
The surface layer of cotton fabric is cut to form and glued onto the rubber. While the construction looks to be top notch, one potential problem I can see, is that over time the edges might begin to lift. Only long term use can determine whether this proves to be the case.


As I see it, the potential appeal of this saddle is two-fold: Those who do not use leather for ethical reasons will welcome a non-leather option from Brooks. And those who dislike how much Brooks leather saddles change shape over time might prefer the stability of the Cambium's construction.It is also interesting how Brooks went with natural, rather than synthetic materials in constructing this saddle, in keeping with its usual aesthetics. The C-17 will look good on a wide range of bikes, classic and modern.


Well, that is all for now. I am going to try this saddle on a semi-upright pathrace-style bike, then on my roadbike, and report back in a couple of weeks. If you have any questions in the meantime about the construction, shape or aesthetics, feel free to ask. In fairness to Brooks, I would like to note that I was not asked to write about the saddle on this blog or to publicise it in any way; my role as a beta-tester involves only private feedback. I believe the Cambium C-17 and C-17S will be available for sale in September, as a limited edition release. You can see its full specs, as well as read feedback from those who were in the earlier waves of testers, here.

Las Trampas Cascade


Cascade, Las Trampas, originally uploaded by ParsecTraveller.

One of the multiple cascades to be found along an unnamed creek in Las Trampas. There are still colorful red leaves on the ground from fall...and spring is here!

Sunset Park

Very short wander to this viewpoint


Straight down to the water


From a little higher


Manhattan in the misty distance


A local denizen

Saturday, April 7, 2012

5-Speed Conversion!

My conversion of the Mercier mixte to a 5-speed is pretty much complete, and it worked out nicely. I've received some questions about the process since I first mentioned my plan to do this, so I include answers to these questions here.

What is a 5-Speed Conversion?
A 5-speed conversion refers to transforming a vintage 10-speed bicycle into a 5-speed by removing one of the two front chainrings and the front derailleur system (see before and after pictures above). In the end, the bicycle is left with a much simpler set-up of 5 chainrings in the rear, 1 chainring in the front, and a single gear shifter. It works much the same as a 5-speed hub, only the gears are visible rather than hidden inside the hub.

Why do this? Doesn't it mean you have fewer speeds now?
Hard question to answer, but I will try: The advantage of a derailleur over an internal hub, is that it allows for much wider spaced gearing. Riding the Mercier around hilly areas, I can get by perfectly well with just the middle 3 rear gears. The 2 extra rear chainrings provide a nice "just in case" buffer of one higher and one lower gear than I'd ever need, but the second front ring (which provides 5 additional speeds) and the whole front derailleur system (which switches between the two front rings) are useless entirely in the context of where and how I plan to ride this bike. Given my certainty of this, converting it to a 5-speed made sense, because it would simplify the handling of the bicycle and it would get rid of extraneous components. Also, this bike (as many older French bicycles) was originally designed to have a rear-only derailleur system. This is evident, because it has a braze-on (on the downtube) for just a single gear shifter. So converting it to a 5-speed reverts to a traditional design.

If you're going to make it a 5-speed, why not use a 5-speed hub and ditch the derailleur system all together?
The main reason, is that no existing 5-speed hub could give me the same customised, wide spacing as a 5-speed rear derailleur. It's not just about how many speeds you have, but how useful each of those speeds are. Additionally, it would cost a ton of money to rebuild the rear wheel with a 5-speed hub, whereas the 5-speed derailleur conversion was inexpensive. And finally, I am trying to keep this bicycle fitted with traditional components, and French bicycles were traditionally fitted with derailleurs.

How was the conversion done?
Keeping in mind that the process will differ depending on your current set-up, here is what generally needs to be done, step-by-step:

1. Front chainring removal
Since you will only have one chainring in the front now, you need to figure out how to get rid of the second one. The main issue here has to do with how the crank arm is attached to the ring(s). On some bicycles, it is possible to simply remove the extraneous chainring and the remaining chainring will hold up the crank. On my Mercier, the two rings are a unit, attached to the crank via a proprietary bolt system. To make a long story short, we could not simply remove the extra ring. Rather than get an entire new chainring and crank system, it occured to me that perhaps the teeth on the bigger chainring could be filed off - turning the ring into a chainguard. I discussed the idea with metalworker and bicycle mechanic Jon Gehman, who is a reader of this blog, and he agreed that this was a good way to go. I then sent him the chainring for a "de-toothing" service, and he did a spectacular job.

Here is a close-up of what was formerly the larger chainring. Notice how beautifully the edge is done - giving it a professionally finished look.

2. Front derailleur removal
This was the easiest part. The Simplex front derailleur simply unbolts and removes. On the picture above you can see that the rainbow decal is a little worn where it used to be, but that is all.

3. Changing the shifters
The ease or difficulty of this step depends entirely on what sort of shifters you have to begin with. If your bicycle has separate (unconnected) shifters for the rear and front derailleurs, then you simply remove the one that controls the front and you are done. If your shifters are a unit, then you will have to remove them and install a single shifter instead. Above is a vintage Huret single shifter for mounting on the stem that I bought for this purpose. It's beautiful, "period-correct", and can be bought fairly inexpensively. The Co-Habitant installed the shifter and connected the cable to the derailleur.

Here is the Huret shifter installed on the stem. I am not 100% sure though that this is the ultimate solution. Originally, the Mercier had downtube shifters, and this is where the single braze-on is located. However, I do not understand how one is supposed to use downtube shifters on a near-upright bicycle. At least for me, and in traffic, they were too much to handle - especially given that the shifting has to be done with the right hand.

So now there is a cable stopper where the downtube braze-on is, and the cable then extends further to the stem. Though the Huret shifter is beautiful on its own, I am not sure how fitting it is here. For instance, the reason it is not all the way at the bottom of the stem, is that placing it here makes it hit the handlebar when it is moved all the way forward. Hmm, right? Your thoughts on this welcome.

Overall I am thrilled with the 5-speed conversion. The Mercier is light, easier than ever to handle, and now ready for its fate as Studio Bike. I admit that I am reluctant to send it over to the Studio and quite like having it here at home. But I also look forward to exploring a new neighborhood together... and to having less bike clutter in our apartment!