Saturday, February 28, 2009

Ice is coming...time to start thinking about technique.

Photo courtesy of:http://www.alpineexposures.com/


Every fall I start thinking about ice climbing again, what I learned last year, and what I find are the important things I want to work on this year and the kind of climbing I most enjoy.


Over and over again for the last half dozen years I think the ability to use one tool in the most effective manner is the most importantadvantage with the newest ice tools. Some tools allow you to take advantage of that opportunity better than others.


But no matter the style of tool, being able to easily match hands on an ice tool and make the lest amount of placements per foot of vertical gain is what we are looking for and what is really important.


The fewer the placements the betteryour endurance. The more positions you can use on your tool the more your strengthwill last, short or long term. That will happen on vertical ice or less than as well.


The more you move your hands around and use them in slightly differing manners the warmer your hands will generally stay.


These are videos I have posted previous. But if you haven't seen them it is worth taking a close look at how the climbers in each use their tools. Both the videos are getting dated now for gear but the climbing techniques shown are not. Hopefully you'll get some new ideas of your own from what you see.


and another example here:


http://www.tvmountain.com/video/alpinisme/6769-goulotte-lara-toun-grand-capucin.html


I like havingoptions!

Friday, February 27, 2009

Mesa Verde :: Balcony House

After having first visited the Cliff Palace, the tour of Balcony House was as much about the ladders, passageways and tunnel that had to be traversed in getting there and back as it was in seeing the 40 rooms of the complex. The tour to Balcony House is touted as being the most adventurous of those offered at Mesa Verde and is definitely not for the faint of heart!

Getting down to the level of the Balcony House involved a series of metal stairways firmly attached to the sides of the cliff.

Then you had to go back up. To that level, up there.

The 32-foot entrance ladder. I got to go up first with the Ranger. I'll admit to being a little nervous. I kept repeating what she had told us: “Don't look down! Keep your eyes focused on the rock in front of you.”

This picture was taken from the second story of the Balcony House, looking down at the ladder and those who have yet to come up.


Upon leaving the dwelling we had to crawl through a 10-foot long tunnel, just barely wide enough for a large person (me) to get through. The Ancestral Puebloans were smaller people than we are today!

Once through the tunnel, it was awkward to get out and stand up again. There wasn't a lot of room to maneuver.

Oh, and then there were two more ladders to climb up. See that chain fencing? It's there for a reason.

Looking down from the base of the second (and final) ladder.

The Ancestral Puebloans wouldn't have had fancy ladders and chain fences to help them get up the cliff walls. How did they do it? The Ranger said they carved hand and foot holds out of the rock. I guess you get used to using what you have available, but I'm very glad we had the ladders and chains to help us along the way!

The Belay Jacket Tutorial


Ryan Johnson bundled under a Fisson SL and a Dually layered over an "action suit" base, photo courtesy of Clint Helander


I write about, study, worry about,buy and use a lot of belay jackets. It hasn't always been so. And until relatively recently (only the last 10 years) in my own climbing career never actually used a "belay jacket". While at the same time for the last 30 yearsI have been intentionally tryingto climb "light and fast", all while not freezing my ass off. With varying amounts of success.


Sure, on the rare occasion I have carried what some would refer to now as a "belay jacket". But they were really just part of my sleeping system that allowed me to carry a lighter bag. Not anything Iintentionally wanted to climb in. And even then it would have to be pretty darn cold for me to be able to climb in those same jackets without over heating.


With out a belay jacket, and more importantly, without the knowledge of how to properly use a belay jacket, the idea of "light and fast",generally will mean something other than: light, fastand no sleep till you were off the hill.


At some point your endurance and your gear willlimited what you do in the mountains. The limit (which seems pretty well proven @ this point) for us was 40 hrs of continuous climbing. Better plan on a nap by hour40. Oreven better, a good bit of sleep to recover and better rehydrate from the effort.


It is the decision that you will likely go over 40 hrs that will determine what additionalgear you'll need for the required nap. Andhow much you'll likely suffer for the decision.


From the email the blog generates and the typical Internet traffic on "belay jackets" I see, it is obvious to me that there is some confusion on how a "belay jacket" is best used.


If you have any doubts the first thing you should do is read Mark Twight's EXTREME ALPINISM. The current crop of belay jacketswere specifically designed around theideaon a "action suit" for climbing and easily added over layers of insulation ( the "belay jacket") when stopped, to maintain body heat.


But here is the rub. Like many great ideas, it is how that idea is applied that counts.


Coolmuscles work more efficiently than over heated muscles.

If you don't believe that or don't understand it try a simple test. With the same clothes and effortrun a 10K in the rain @ 50F degrees and runthe same 10K @ 95F degrees


Now apply that lessonto your own climbing. Sure you need to survive. So you'll want to take the amount of insulation required to do so. But you also want to be efficient in your own climbing. Which will mean cool musclesare much better than over heated ones. Take theleast amount of weight that enablesyou to succeed.What you need and nothing more.


A jacket designed for a 60hr ascent of Denali's Solvak route is not likely the same jacket you will need for your local 6 pitch mixed line in the lower 48.


The belay jacket is part of your belay system. It is not, by defnition,a part of your "action" suit.

One is for climbing. Theother is an addition to your climbing suit, to retain the body heat you have just generated by climbing, to limit theeffects of nomovement while belaying.


It is important to differentiate between the two. A 60g Atom LT or a Gamma MX shell that are the major part of your upper body "action suit" are not part of your "belay jacket" system. In the opening picture for this blog Ryan is using a Fisson SL (76g) and a Duelly (152g) as his "belay jacket" system. That is a full 200+ g ofArcteryx's Therma Tek insulation! Early Spring can be prettycold in the shade on the Kahiltna.


The Atom LT Ryanclimbs in or the soft shell you climb inas a the main upper layer of your "action suit" is not a "belay layer". My guesswhereclimbersget into trouble is by thinkingthat a 60g Atom LT and a 100g SV...as good as the combo is to climb in...will then be aswarm as a Atom LT and Duelly combo. The 60/100 g combois not going to be as warm. You are talking 160g verses 230g combos.Seems obviousdoesn't it? But I have seen others suggesting exactly that.


It is bad math to add your action suit insulation to your "belay jacket" insulation. In other words take the insulation required in yourbelay jacket....just don't take any more than required.


It should be obvious by now that could be 60g or 260g depending on your objective.


I can't tell you how many times I have regretted not taking my own advice. Freezing my ass off at a belay, and then because I was chilled, leaving my belay jacket on to follow the pitch. Then almost immediately over heating mid pitch because of thatmistake. That is with just100g insulation for my Belay Jacket, even @ -30C!I would have been better off to start off cold and warm up on the pitch by climbing. My clothes would have stayed drier. I would have stayedbetter hydrated. And most importantly I would have been stronger overall on route. I am a slow learner. But I do eventually learn from my mistakes.


Here is a list of what is available from Arcteryx and Patagonia as an example of insulation in their various models. Depending on the temperatures any one of them, or any combination of them, could be used as the perfect "belay jacket".


Arcteryx:


60g coreloft Atom LT

100g corloft Atom SV

140g Coreloft Kappa SV

153g of Therma Tek Duelly

153g of Therma Tek Fission SL with GTX Pro Shell


Patagoniua:


60g of Primaloft 1 Nano Puff Series

100g Primaloft Sport Micro Puff Series

170g Primaloft 1 DAS (/ version)

Thursday, February 26, 2009

Midsummer Storm at the Spirit Tree


Yesterday throughout the day and all through last night we experienced one incredible thunderstorm after another. Some particulars from the weather warnings throughout the day: 70 MPH winds, possible golf-ball size hail, heavy rainfall and flood advisories. To top it off the power was out for most of the night as well. We ended up with anywhere from 2 to 4 inches of rain, depending on where the measurement was taken. The Pigeon River in Grand Portage State Park went from a discharge rate of roughly 4,000 gallons per second yesterday morning to about 28,000 gallons per second today. The storms also produced the best lightning show that we've seen so far this year.


As day turned to night I couldn't resist the light show that was going on all over in the sky. I ended up spending about two and a half hours standing on the Lake Superior shoreline trying to capture photos of the lightning. I went down to the Spirit Tree, which is not far from my home. I've always wanted to capture a "knock your socks off" photo of lightning behind the tree (similar to a shot that my dad captured on slide film years ago), but the photo I dream of still eludes me. I am getting closer, however. Last night's storms yielded my best results yet at photographing lightningbehind the tree. The photo you see here is the result of two hours of standing in the rain trying to capture the perfect bolt of lightning while thunder rumbled all around me. It was definitely one of the most uncomfortable periods of time I've ever spent outside with my camera, but an effort that I consider worthwhile when I view this image.

Friday, February 20, 2009

Crud Road Racer Fenders

Moser with Crud Fenders
My long-suffering Francesco Moser roadbikeis now sporting some fenders. A 1970s racing bike that originally came with tubulars, the frame has very tight clearances, and the rear brake bridge is particularly low. Even with 23mm tires it will not fit conventional fenders. That is why I wanted to try the Crud Road Racers - described as "mudguards for race bikes with minimum clearances." These fenders are rated to fit bikes with 4mm of clearance under the brake bridge. The Moser has just barely that.


Crud Fenders

Crud is an English company, and according to the packaging information the fenders are manufactured in Yorkshire, UK. Crud has recently become a sponsor, but the fenders pictured are mine and not a complimentary sample. My discovery of the Road Racers is owed to local randonneur Pamela Blalock, who uses them on her main brevet bike and prefers them to other fenders she's tried. Pamela describes the Cruds as highly durable, easy to install and remove, and extremely lightweight - a combination of characteristics that appealed to me. On a pure roadbike with narrow tires, I do not want permanent fenders. But I do want the option of installing them on occasion. While temporary clip-ons exist, they are flimsy and do not provide adequate coverage. The appealing thing about Crud is that they are real, full coverage fenders with the same easy on/off versatility.


Crud Fenders

Being entirely unfamiliar with Crud fenders to start with, it took us some time to understand how they are put together and what the installation procedure is. There is a brief instructions manual and an online video that might be a good idea to watch before starting. But once you know it's done, I would say the process should take 15 minutes tops.


Crud Fenders

The installation does not require any tools, and it does not require the hand strength to use real tools. Everything is affixed by hand using moderate pressure, with a combination of the plastic bolts, zip ties and rubber bands included in the kit.


Crud Fenders
The fenders are modular - the blade in 3 parts, plus the stays - making them easy to store and transport.


Crud Fenders
To install the fenders, the fork/stay attachment points are first installed using the double rubber bands provided. The fender is then partially assembled, slid under the brake bridge, and then the stays are attached to these points.


Crud Fenders
This is the attachment point for under the brake bridge. On some bikes it might be necessary to deflate the tire or remove the wheel to do this.


Crud Fenders

And here is the screw connecting the different parts of the blade.


Crud Fenders

Zipties are used to affix the fender to the brake bridge.


Crud Fenders

And also to affix the rear fender to the seat tube, above the front derailleur.


Crud Fenders
At the point where the fender attaches to the seat tube, there are two sets of holes that the zip-tie can go through, and we managed to tear one of them when adjusting the fender, so be aware. This point of attachment should be the last step, after the fender's position is set.


Crud Fenders

This part of the fender provides extra coverage. The clearances are tight here and it's close, but does not interfere with the derailleur.


Crud Fenders
As part of the installation,Crud provides these fuzzy adhesive pads to guard the tire from rubbing the fender directly.


Crud Fenders

Here they are peaking out from the sides.


Crud Fenders
The rear of the front fender is very close to my toe, but there does not seem to be overlap with my feet strapped in.


Crud Fenders
The front part of the front blade is a little skimpy compared to the rest of the fenders, but otherwise the coverage they provide is excellent.


Crud Fenders

Aesthetically, I think the Cruds look elegant and appropriate on a racy roadbike. When fitting bikes like this with fenders, the classic ones don't really look right and the clip-on ones are extremely ugly. To my eye, these look just right. And if you want to make them fancy, they can even be painted.


Moser with Crud Fenders
The clearance under the rear brake bridge on my Moser is only borderline adequate for these fenders and I am still deciding whether it's a good idea to use them regularly. But I will definitely use them on my new roadbike, where the clearances will be sufficient.


If the fit is right, I think the design is great for road/racing bikes that have tight clearances and no eyelets, or where you simply do not want the commitment of metal fender installation. While I can't speak for the fenders' durability at this stage, I am pleased withtheir full coverage,easy installation and removal, light weight, and subdued appearance. More pictures here.

Thursday, February 19, 2009

Evolution of a Veranda

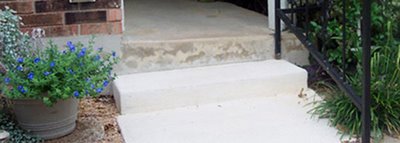
The word veranda didn’t come to mind when we first saw our house in ... We were focused on interior dimensions, gardening space, and price. The long front porch with two center steps and a ramp at one end was just another part of the house. Once the house was ours, however, I began to ponder the word, savoring the possibilities.

Webster’s Unabridged Dictionary defines a veranda as a large open porch, usually roofed and partly enclosed, as by a railing, often extending across the front and sides of a house. Did our space pass this test? The porch extends thirty-seven feet across most of the front of the house, with open sides, wooden columns and black metal railings on the front edge. The whole thing has an overhanging roof, shading the house from the Western sun. I began calling our porch The Veranda.


It sure didn’t feel like a veranda at first. The pierced metal ramp was handy when the movers rolled the piano to the door, but rain or water transformed shoes into skates. Visitors slipped and our family grew wary. After I flew off the slick surface twice, landing hard on the drive, Philo sawed off the ramp & then contemplated angles, as he designed and constructed new steps.

We added a wooden bench, a plant stand and two metal chairs from the deck of the previous house. Furniture and doodads made the porch feel more like a room, but greenery was essential to my idea of a veranda.

Philo attached metal hooks for hanging baskets; they’re stuffed with pansies in winter and they produce a veil of ornamental potato vines in summer. A parlor palm and houseplants spend most of the year out on the porch while the center steps are flanked by two large hypertufa pots filled with purple oxalis.

On many gardening sites, new owners describe how they transformed their older houses, removing old hedges to 'open up the view' to the porch. Abundant flowers replace the hedges, Smith & Hawken add pizzazz to the scene, and the happy owner stands on his new stage, while neighbors marvel at the improvement.

I like to read these stories, and am glad their homes have become the right setting for their lives.


But as someone who has spent years envisioning a Southern garden, I could not chop down my mature boxwoods . I rather enjoy hedges, shade, mystery, privacy and a feeling of enclosure. Rather than banishing our shrubs, we encouraged the boxwood hedge to grow slightly taller, clipping it level with the railing.

Now, after working in the yard I can lounge on the bench, waving hello and conversing with my neighbors, but my muddy knees & battered shoes aren’t on display. Instead of taking center stage, we prefer the Box Seats.

Life can be a little more civilized when you have a Veranda - a place to sit and sip, to read or talk, a place that’s not exactly inside, yet not quite outside.


Wednesday, February 18, 2009

Middle Falls Trail overlooks


Yesterday I posted a picture of Middle Falls in Grand Portage State Park and mentioned the ridge-top overlooks that are along the trail. The photo aboveis taken from the part of the ridge that overlooks Lake Superior. Out in the lake on the left side of the photo you can see a portion of the Susie Islands archipelago, on the right edge of the photo is Hat Point. In between lies Wauswaugoning Bay and Francis Island. It sure is a beautiful view and is certainly worth the hike up the ridge!


After taking in the view of Lake Superior, you can continue to the back side of the ridge for a view of the Pigeon River Valley (above photo). This view, in my opinion, is just as impressive and enjoyable to take in as the view toward the lake. Near the middle of the photo you can see the river as it makes its way toward Lake Superior. High Falls of the Pigeon River is just out of sight on the right edge of this photo. Remember, the Pigeon River is the border between the U.S. and Canada, so all of the land across the river from this viewpoint is in the province of Ontario, Canada! You can also see a glimpse of Lake Superior to the right. FYI - this trail makes for a wonderful fall color hike :-)